Citrix on Azure Cloud

A technical overview of Citrix on Azure Cloud Architecture

Introduction

In application and desktop virtualization, Citrix has been the leader for over two decades. The new version of XenApp, XenDesktop is now ready for Cloud.

Citrix XenApp and XenDesktop provides session, application and desktop virtualization technologies to administrators to manage centralized hosted applications and desktops. Also, it provides advanced management and scalability, a rich multimedia experience over any network and self-service applications with any endpoint devices such as (laptops, smartphones, PCs, tablets and Macs).

Microsoft Azure is a reliable and flexible cloud platform that allows simple as well as multi-tier applications to be deployed quickly in Microsoft-managed data centers. The architectural model presented here describes a basic Azure deployment for delivering Citrix application and desktop services to users. It enables a hybrid approach in which organizations can extend on-premise infrastructure and use Azure IaaS to deliver these services. Key objectives for the design include easy scalability of XenApp and XenDesktop workloads as well as high availability.

Microsoft Azure for Citrix

Microsoft Azure hosts infrastructure components in Microsoft managed datacenters on geographic regions. Which allows to provision or deploy XenApp and XenDesktop on Azure IaaS on demand.

Microsoft Azure deployment consideration

As part of the planning stage when evaluating Hybrid Cloud solutions.  One of the considerations for many organization is geographic diversity – both for supporting a global user audience as well as for disaster recovery purposes.

 fig-1

Microsoft Azure Global Footprint


Microsoft Azure deployment concepts

Microsoft Azure makes it possible to spin up new VMs in minutes and adjust usage quickly as infrastructure requirements change and “Pay-as-you-go” pricing for Azure virtual machines. When deploying XenApp or XenDesktop on Azure, there are three critical types of Azure IaaS components: compute, storage, and networking.

  • Azure IaaS Components:

    1. Compute – 
    Virtual Machines

VMs supply the basic Infrastructure-as-a-Service (IaaS) functionality and are assigned compute, memory, and I/O resources based on an Azure compute instance type.

Cloud Services

Azure Cloud Services function as containers for VMs, simplifying deployment and scalability of multi-tier applications.

Availability Sets

Defining VMs in an Availability Set causes them to be hosted on different racks in the Microsoft data center, enhancing availability. As shown in the Microsoft Azure deployment concepts and terminology. Cloud Service on the left contains both VMs as well as VMs defined in an Availability Set (outlined by a red dashed line). The Cloud Service on the right houses multiple VMs. All VMs in a Cloud Service are automatically connected to the same virtual network and permit communication across all UDP and TCP ports.

2. Storage Accounts – Azure provides different storage categories and redundancy options and offers three options for replicating page blob storage for VMs.

  Page Blobs

Azure VMs use “page blobs”, block storage that is optimized for random read and write operations and is therefore recommended for XenApp deployments.

i) Local Redundant Storage (LRS), which creates three synchronous data copies within a single data center.

ii) Geographically Redundant (GRS), which replicates data three times in a primary region and three times in a remote secondary region to protect against a data center outage or a disaster.

iii) Read-Access (RA-GRS), which is the same as GRS but supplies read access to the secondary data center.

3. Networking – Azure allows the creation of standalone, cloud-only virtual networks as well as VPNs that support cross-premises connectivity. VMs constructed within an Azure virtual network can communicate directly and securely with one another, and there is no cost associated with VM communication or data transfers within a single region.

Microsoft Azure deployment concepts and terminology

  • Citrix Infrastructure Components

In support of a XenApp deployment on Azure, the following additional components are configured or provided by Azure:

  1. Active Directory (AD)-Client authentication and access management
  2. DNS–For Name resolution
  3. DHCP–IP configuration Azure provides DHCP services that assign private IP addresses to VMs using a specified IP address range.
  4. SQL-Static information and configuration settings store.
  5. Delivery Controller–to manage XenApp and XenDesktop connections and connection policies, and acquire licenses for end-users.
  6. StoreFront- enable user log-on and the selection of different desktop and application options.
  7. Netscaler VPX- encrypt and authenticate all connections between users and the XenApp infrastructure.
  8. Traffic Manager- for DNS load balancing and route traffic to different virtual networks in different data centers.

Network-level load balancing- Azure can load balance external traffic across virtual machines in a Cloud Service or internally between virtual machines in a Cloud Service or virtual network.

Implementing Citrix XenApp and XenDesktop on Azure IaaS

  • Citrix XenApp deployment architecture on premise design.

On Premise XenApp Architecture


  • The first step in an Azure implementation is to create a sizing plan based on specific requirements. The appropriate number of Cloud Services, Storage Accounts, and VMs required in Azure depends on estimates for the number and type of users in the environment.
  • There are different server functions that must be considered in the sizing of Azure resources: Infrastructure servers, XenApp workload servers, and XenDesktop VDI workload servers. In planning an Azure deployment, it’s necessary to consider the appropriate sizing of each.
  • XenApp/XenDesktop infrastructure and workload servers must be co-located in a single Azure region. XenApp and XenDesktop virtual servers can’t be distributed or split across multiple Azure regions (although more than one site can contain a full deployment).
  • Implementing Citrix XenApp and XenDesktop on Microsoft Azure IaaS, the deployment architecture follows a traditional on premise design for provisioning XenApp workloads.


  • As in a traditional on-premise XenApp topology, the NetScaler service receives client requests and proxies network traffic to the XenApp/XenDesktop worker hosts in the virtual network. StoreFront servers provide login services and a directory from which users select desktop and application services. Delivery Controllers distribute connections and set up service delivery from XenApp session and XenDesktop VDI hosts.

Advantages

Using Azure as infrastructure for a Citrix-powered desktop and app solution allows customers to grow the environment gradually and predictably without having to over-size a solution for the worst-case load scenarios. Avoid the large capital expense associated with build outs and “pay as you go”

Business continuity to leverage XenDesktop on Windows Azure during business disruptions caused by power outages, natural disasters or other unforeseen disruptions.


References

https://azure.microsoft.com/en-us/documentation/articles/azure-subscription-service-limits/

http://azure.microsoft.com/en-us/pricing/details/virtual-machines

http://docs.citrix.com

https://www.citrix.com.pl/solutions/desktop-virtualization/overview.html

http://azure.microsoft.com/en-us/documentation/articles/azure-subscription-service-limits/

About Author

Sameer Asif is a Lead Technical Consultant with 7 years of industry experience as Citrix consultant. Worked on implementation, migration, deployment, up gradation of Citrix XenApp, XenDesktop, PVS and VDI Windows Server family, AD, DNS, DHCP, Group Policy, Xen Server, VMware Esxi4.1 and Microsoft Certified Professional.

Oracle 12c Flex RAC Architecture Implementation

White Paper on Oracle 12c Flex RAC Architecture Implementation – Technical Procedure

Build four node Oracle RAC 12cR1 12.1.0.2
(Oracle 12c Flex Cluster / Flex ASM) with GNS (DNS, DHCP) and HAIP.

In the article you will have an insight on Installation of Oracle 12c Flex Cluster (12.1.0.2) consisting of two HUB nodes and two Leaf Nodes. Overall we will build four nodes Oracle 12c Flex Cluster (12.1.0.2) RAC system on Oracle Enterprise Linux (OEL 6.4).

The setup will implement a role separation with different users for Oracle RDBMS and Oracle GI that is, user oracle and grid respectively in order to split the responsibilities between DBAs and storage administrators.

The article will show you how to configure DHCP and a sample DNS setup for GNS deployment. You will have a glimpse at deploying HAIP feature allowing up to four private interconnect interfaces.

The Software to be Used

  1. Oracle 12cR1 (12.1.0.2) for Linux (x86-64)
  2. Oracle Enterprise Linux OEL 6.4(x86-64)

Machines will be Created and Used

1.RAC node oel64a

2.RAC node oel64b

3.RAC node oel64c

4.RAC node oel64d

Ideally a DNS server should be on a dedicated physical server not a part of the cluster. But here the Server OEL64A will also host storage along with DNS and GNS.

The four virtual machines, OEL64A, OEL64B, OEL64C and OEL64D, will be configured for RAC nodes each with 10GB RAM

100GB bootable disk (Disk space will be dynamically allocated not a fixed size pre-allocation)

NIC – bridged for public interface in RAC with address

192.168.2.21/22/23/24 (first IP 192.168.2.21 on oel64a, second IP

192.168.2.22 on node oel64b, 192.168.2.23 on oel64c and 192.168.2.24 on oel64d). These are public interface in RAC.

NIC – bridged for private interface in RAC with address

10.10.2.21/22/23/24 (first IP 10.10.2.21 on oel64a, second IP

10.10.2.22 on node oel64b, 192.10.2.23 on oel64c and 192.10.2.24 on oel64d). These are private interface in RAC.

NIC – bridged for private interface in RAC with address

10.10.5.21/22/23/24 (first IP 10.10.5.21 on oel64a, second IP

10.10.5.22 on node oel64b, 10.10.5.23 on oel64c and 10.10.5.24 on oel64d). These are private interface in RAC.

NIC – bridged for private interface in RAC with address

10.10.10.21/22/23/24 (first IP 10.10.10.21 on oel64a,second IP

10.10.10.22 on node oel64b, 10.10.10.23 on oel64c and 10.10.10.24 on oel64d). These are private interface in RAC.

5 10GB attached shared disks for the ASM storage. (External Redundancy ASM disk groups will be deployed).

■ oel64a

  1. Create an OEL64A with OEL 6.4 as guest OS for node oel64a.
  2. Configure the OEL64A to meet the prerequisites for GI and RAC 12.1.0.2 deployment.
  3. Clone OEL64A to OEL64B.
  4. Clone OEL64A to OEL64C.
  5. Clone ORL64A to OEL64D
  6. Set up DNS and DHCP server on OEL64A.
  7. Install GI 12.1.0.2 on oel64a, oel64b, oel64c and oel64d.
  8. Install RAC RDBMS 12.1.0.2 on oel64a, el64b, oel64c and oel64d.
  9. Create a policy managed database RACDB sule1 and sule2.
  10. Verify database creation and create a service.

■ Note Here

Nodes OEL64A and OEL64B are Hub Nodes and will have ASM and DB instances. OEL64C and OEL64D will be Leaf Nodes for Application Deployment

eth1  10.10.2.21   10.10.2.22  10.10.2.23  10.10.2.24   Private

eth0  192.168.2.21 192.168.2.22 192.168.2.23 192.168.2.24 Public

eth2  10.10.10.21  10.10.10.22 10.10.10.23 10.10.10.24   Private

eth3  10.10.5.21   10.10.5.22  10.10.5.23  0.10.5.24    Private

User Creation and OS Level Configuration

[root@oel64a Desktop]# useradd -u 501 -g oinstall -G asmadmin,asmdba,asmoper grid

[root@oel64a Desktop]# useradd -u 502 -g oinstall -G dba,backupdba,asmdba,dgdba oracle

[root@oel64a Desktop]# passwd grid

Changing password for user grid

New password:

BAD PASSWORD: it is too short

BAD PASSWORD: is too simple

Retype new password:

passwd: all authentication tokens updated successfully.

[root@oel64a Desktop]# passwd oracle

Changing password for user oracle

New password:

BAD PASSWORD: it is based on a dictionary word

BAD PASSWORD: is too simple

Retype new password:

passwd: all authentication tokens updated successfully.

[root@oel64a Desktop]#

■ Add into /etc/sysctl.conf

net.bridge.bridge-nf-call-ip6tables = 0

net.bridge.bridge-nf-call-iptables = 0

net.bridge.bridge-nf-call-arptables = 0

fs.aio-max-nr = 1048576

fs.file-max = 6815744

kernel.shmall = 2097152

kernel.shmmni = 4096

kernel.sem = 250 32000 100 128

net.ipv4.ip_local_port_range = 9000 65500

net.core.rmem_default = 262144

net.core.rmem_max = 4194304

net.core.wmem_default = 262144

net.core.wmem_max = 1048586

net.ipv4.conf.eth2.rp_filter = 2

net.ipv4.conf.eth2.rp_filter = 2

net.ipv4.conf.eth1.rp_filter = 1

net.ipv4.conf.eth0.rp_filter = 2

kernel.shmmax = 2074277888

fs.suid_dumpable = 1

# Controls the maximum number of shared memory segments, in pages

kernel.shmall = 4294967296

■ Set the user limits for oracle and grid users in /etc/security/limits.conf to restrict the maximum number of processes for the oracle software owner users to 16384 and maximum number of open files to 65536.

■ For disabling the NTP make sure that the NTP service is stopped and

disabled for auto-start and there is not configuration file.

o /sbin/service ntpd stop

o chkconfig ntpd off

o mv /etc/ntp.conf to /etc/ntp.conf.org

■ Add users and groups.

groupadd -g 1000 oinstall

groupadd -g 1020 asmadmin

groupadd -g 1021 asmdba

groupadd -g 1031 dba

groupadd -g 1022 asmoper

groupadd -g 1023 oper

useradd -u 1100 -g oinstall -G asmadmin,asmdba,dba,asmoper grid

useradd -u 1101 -g oinstall -G dba,asmdba,oper oracle

[root@oel64a shm]# groupadd -g 1020 asmadmin

[root@oel64a shm]# groupadd -g 1000 oinstall

[root@oel64a shm]# groupadd -g 1020 asmadmin

[root@oel64a shm]# groupadd -g 1021 asmdba

[root@oel64a shm]# groupadd -g 1031 dba

[root@oel64a shm]# groupadd -g 1022 asmoper

[root@oel64a shm]# groupadd -g 1023 oper

[root@oel64a shm]#

[root@oel64a shm]# useradd -u 1100 -g oinstall -G asmadmin,asmdba,dba,asmoper,grid

[root@oel64a shm]# useradd -u 1101 -g oinstall -G dba,asmdba,oper oracle

[root@oel64a shm]#

■ Set the permissions and directories. Note that Oracle RDBMS directory will be created by OUI in the location specified in the profile.

[root@oel64a shm]# mkdir -p /u01/app/12.1.0.2/grid

[root@oel64a shm]# mkdir -p /u01/app/grid

[root@oel64a shm]# mkdir -p /u01/app/oracle

[root@oel64a shm]# chown grid:oinstall /u01/app/12.1.0.2/grid

[root@oel64a shm]# chown grid:oinstall /u01/app/grid

[root@oel64a shm]# chown oracle:oinstall /u01/app/oracle

[root@oel64a shm]# chown -R grid:oinstall /u01

[root@oel64a shm]# mkdir -p /u01/app/oracle

[root@oel64a shm]# chmod -R 775 /u01/

[root@oel64a shm]#

Install the ASM packages

[root@oel64a sf_Software]# rpm -ivh oracleasm

oracleasmlib-2.0.4-1.el6.x86_64.rpm       oracleasm-support-2.1.8-1.el6.x86_64.rpm

[root@oel64a sf_Software]# rpm -ivh oracleasmlib-2.0.4-1.el6.x86_64.rpm

warning: oracleasmlib-2.0.4-1.el6.x86_64.rpm: Header V3 RSA/SHA256 Signature, key ID ec551f03: NOKEY

Preparing…                ########################################### [100%]

1:oracleasmlib           ########################################### [100%]

[root@oel64a sf_Software]# rpm -ivh oracleasm-support-2.1.8-1.el6.x86_64.rpm

warning: oracleasm-support-2.1.8-1.el6.x86_64.rpm: Header V3 RSA/SHA256 Signature, key ID ec551f03: NOKEY

Preparing…                ########################################### [100%]

package oracleasm-support-2.1.8-1.el6.x86_64 is already installed

[root@oel64a sf_Software]# /etc/init.d/oracleasm configure

Configuring the Oracle ASM library driver.

This will configure the on-boot properties of the Oracle ASM library

driver.  The following questions will determine whether the driver is

loaded on boot and what permissions it will have.  The current values

will be shown in brackets (‘[]’).  Hitting <ENTER> without typing an

answer will keep that current value. Ctrl-C will abort.


Default user to own the driver interface []: grid

Default group to own the driver interface []: asmadmin

Start Oracle ASM library driver on boot (y/n) [n]: y

Scan for Oracle ASM disks on boot (y/n) [y]: y

Writing Oracle ASM library driver configuration: done

Initializing the Oracle ASMLib driver:                     [  OK  ]

Scanning the system for Oracle ASMLib disks:    [  OK  ]

■ Reboot oel64a server.

■ Clone OEL64A to OEL64B

■ Clone OEL64A to OEL64C

■ Clone OEL64A to OEL64D

■ Now power on the OEL64B / OEL64C / OEL64D and complete the following steps

■ Set up the networking and hostname properly

Set up DNS and DHCP

■ Set up DNS

The steps in this section are to be executed as root user only on oel61. Only /etc/resolv.conf needs to be modified on all three nodes as root.

As root on oel64a setup a DNS by creating the following zones in

/etc/named.conf

Create a file /etc/dhcp/dhcpd.conf to specify

■ Routers – set it to 192.168.2.1

■ Subnet mask – set it to 255.255.255.0

■ Domain name – grid.fujitsu.com

■ Domain name server – From table 1 the IP is 192.168.2.11

■ Time offset – EST

■ Range – from 192.168.2.100 to 192.168.2.130 will be assigned for GNS

■ delegation.

[root@oel61 named]# cat /etc/dhcp/dhcpd.conf

chkconfig dhcpd on

service dhcpd start

[grid@oel64a grid]$ ./runInstaller

Oracle Software Installation

■ Select skip software updates and press Next to continue.

■ Select Install and Configure GI and press Next to continue.

■ Select Advanced installation and press Next to continue.

■ Select languages and press Next to continue.

■ Enter the requested data and press Next to continue. The GNS sub-domain is gns.grid.fujitsu.com. The GNS VIP is           192.168.2.52. SCAN post is 1521.

■ Click Add.

■ Click SSH Connectivity.

Select 192.168.2 as public and all 10.10 as private. Press Next to continue.

HAIP will be deployed and examined.

■ Select ASM and press Next to continue.

■ Select disk group DATA as specified and press Next to continue.

■ Enter password and press Next to continue.

■ De-select IPMI and press Next to continue.

■ Specify the groups and press Next to continue.

■ Specify locations and press Next to continue.

■ Examine the findings.

■ The errors are as follows

[root@oel64a bin]# time nslookup not-known

;; connection timed out; no servers could be reached

real    0m15.009s

user    0m0.002s

sys     0m0.002s

Solution

  1. For PRVE-0453 set RP_FILTER as indicated below on each node of the cluster.

[root@oel64a disks]# for i in /proc/sys/net/ipv4/conf/*/rp_filter ; do

> echo 2 > $i

> done

[root@oel64a disks]#

  1. For PRVF-10406 ASM disk needs to be with right permissions and ownership.
  2. For PRVF-5636 make sure that nslookup always returns for less than 10s. In the example below it takes 15 sec.

[root@oel64a bin]# time nslookup not-known

;; connection timed out; no servers could be reached

real    0m15.009s

user    0m0.002s

sys     0m0.002s

[root@oel64a bin]#

■ Review the Summary settings and press Install to continue.

■ Wait until prompted for running scripts as root.

■ Check OS processes:

[root@oel64a bin]# ps -ef | grep d.bin

■ Check GI resource status.

[root@oel64a bin]# ./crsctl status res -t

■ Check the interfaces

[grid@oel64a grid]$ oifcfg getif -global

■ Check the interfaces from ASM instance.

SQL> select * from V$CLUSTER_INTERCONNECTS;

SQL> select * from V$configured_interconnects

■ Check the GNS

[grid@oel64b ~]$ cluvfy comp gns -postcrsinst -verbose

Install RAC RDBMS 11.2.0.3 on oel64a and oel64b

■ Login as oracle user and start OUI from the staging directory.

■ Select skip software updates.

■ Select Install software only and press Next to continue.

■ Select RAC installation and select all node and press Next to continue.

■ Establish SSH connectivity.

■ Select language.

■ Select EE and press Next to continue.

■ Select software locations and press Next to continue.

■ Select groups and press Next to continue.

■ Examine the findings.

■ Press Install to continue.

■ Wait until prompted to run scripts as root.

■ Run the scripts

■ Create a policy managed database RACDB oel64a and oel64b

■ Login as oracle user and start dbca to create a database.

■ Select RAC database and press Next to continue.

■ Select Create a database.

■ Select create a general purpose database and press Next to continue.

■ Specify SID, server pool name and cardinality.

■ Select Configure Enterprise Manager and press Next to continue.

■ Specify password and press Next to continue.

■ Specify disk group and press Next to continue.

■ Specify FRA and enable archiving and press Next to continue.

■ Select sample schemas and press Next to continue.

■ Specify memory size and other parameters. Once done press Next to continue.

■ Keep the storage settings default and press Next to continue.

■ Review

■ Wait for the dbca to succeed.

■ Change the password and exit

■ Login to EM DC using the URL specified above.

■ Cluster Database Home page.

■ Cluster home page.

■ Interconnect page.

■ Verify database creation and create a service

Conclusion

In the article we had an insight on Installation of Oracle 12c Flex Cluster (12.1.0.2) consisting of two HUB nodes and two Leaf Nodes. Overall we will build four nodes Oracle 12c Flex Cluster (12.1.0.2) RAC system on Oracle Enterprise Linux (OEL 6.4).

The setup will implement a role separation with different users for Oracle RDBMS and Oracle GI that is user oracle and grid respectively in order to split the responsibilities between DBAs and storage administrators.

The article described how to configure DHCP and a sample DNS setup for GNS deployment. It will have a glimpse at deploying HAIP feature allowing up to four private interconnect interfaces.

About Author:

Mrinmoy Saha is a Senior Technical Consultant associated having close to 6 years of industry experienced as Oracle DBA. He worked on integration, migration, installation, up-gradation, performance tuning of Oracle 10g.11g,12c.Oracle Certified as OCP 10g,12c,11g R2 RAC Expert

Column Partitioning in Teradata

This is the White Paper on the step-by-step process of Partitioning the table on the basis of Columns in Teradata

Introduction
The idea of data division is to create smaller units of work as well as to make those units of work relevant to the query.

Columnar (or Column Partitioning) is a new physical database design implementation option that allows sets of columns (including just a single column) of a table or join index to be stored in separate partitions. This is effectively an I/o reduction feature to improve performance for suitable classes of workloads.

How CP is different
Let’s consider the below table definition with various physical database designs
CREATE TABLE mytable
(A INT, B INT, C CHAR(100),D INT, E INT, F INT,
G INT, H INT, I INT, J INT, K INT, L INT);
And following query based on the above table:
SELECT SUM(F) FROM mytable WHERE B BETWEEN 4 AND 7;
If the table is populated with 4 million rows of generated data, the query will returns :

About 9,987 data blocks for the PI or NoPI;
• About 4,529 data blocks for the PPI table;
• About 281 data blocks for the Column Partitioned table;
• About 171 data blocks for the CP/RP table.
The decreased I/O comes with higher CPU usage for this example. Since I/O is often relatively expensive compared to CPU (and CPU is getting faster at a much higher rate than I/O), this can be a reasonable trade-off in many cases.

Column Partition Table DDL (with Auto-Compression)
Following is the syntax for Columnar with auto compression feature:

CREATE TABLE Super_Bowl
(Winner CHAR(25) NOT NULL
,Loser CHAR(25) NOT NULL
,Game_Date DATE NOT NULL
,Game_Score CHAR(7) NOT NULL
,Attendance INTEGER)
NO PRIMARY INDEX
PARTITION BY COLUMN;

Note: Auto Compression is on by Default

Columnar Overview

• The Teradata Columnar is built upon the existing NoPI table feature and native row partitioning feature of Teradata Database. So, a NoPI table can be vertically partitioned by column, and horizontally partitioned by row.

• When we accesses a column in a row partitioned table, it reads the entire row from disk into the cpu. But, in column oriented storage, the data from only the columns needed for the query are read from disk. Thus it reduces I/O when only a few of the columns in a table are required to process a query.

• In Teradata Column partitioning the data compression is automatic and depends upon the selection process by analyzing data being loaded and automatically selecting the best compression mechanism or mechanisms for the data. Columnar compression can be used in combination with existing Teradata compression mechanisms (i.e., MVC, algorithmic, and BLC).
CP Table with Row Partitioning DDL

Following is the syntax for column partitioned table with row partitioning:

CREATE TABLE Super_Bowl
(Winner CHAR(25) NOT NULL
,Loser CHAR(25) NOT NULL
,Game_Date DATE NOT NULL
,Game_Score CHAR(7) NOT NULL
,City CHAR(40))
NO PRIMARY INDEX
PARTITION BY(COLUMN,RANGE_N(Game_Date BETWEEN DATE ‘1960-01-01’ and DATE ‘2059-12-1’AL ’10’ YEAR));

Note: Auto Compression is on by Default

CP Table with Multi-Column Container DDL

Following is the syntax for column partitioned table with muti column container :

CREATE TABLE Super_Bowl
(Winner CHAR(25) NOT NULL
,Loser CHAR(25) NOT NULL
,Game_Date DATE NOT NULL
,Game_Score CHAR(7) NOT NULL
,Attendance INTEGER)
NO PRIMARY INDEX
PARTITION BY COLUMN(Winner NO AUTO COMPRESS
,Loser NO AUTO COMPRESS
(Game_Date ,Game_Score ,Attendance)NO AUTO COMPRESS);

Auto-Compression for CP Tables

There are number of compression techniques which Teradata applies automatically on the table. The compression techniques which Teradata applies depends on the analysis of the data being loaded and the best compression mechanism for gaining the maximum space saving.

• In Teradata when a table having column partition is defined to have auto-compression (i.e., the NO AUTO COMPRESS option is not specified), data is compressed by the system as physical rows that are inserted into a column-partitioned table or join index.
• There might be some values, where there is no applicable compression technique that reduces the size of the physical row and the system will determine that these values need not to be compressed.
• When we access any compressed column-partition values then the system decompresses those values.
• The Auto-compression feature is most effective for a column partition with a single column and COLUMN format.
• There is overhead in determining whether or not a physical row is to be compressed and, if it is to be compressed, what compression techniques are to be used in terms of CPU’s and I/O’s .
• This overhead can be eliminated by specifying the NO AUTO COMPRESS option for the column partitioned table.
Auto-Compression Techniques for CP Tables:

There are number of compression techniques that Teradata automatic applies. Some of them are as below:

1>. Run-Length Encoding
This technique compresses each series of one or more column-partition values that are same by having the column-partition value occur once with an associated count of the number of occurrences in the series.

2>.Local Dictionary Compression
This is similar to a user-specified value-list compression for a column. The Often occurring column-partition values within a physical row are placed in a value-list dictionary local to the physical row.

3>.Trim Compression
This compression technique trims the high-order zero bytes of numeric values and trailing pad bytes of character and byte values with bits to indicate how many bytes were trimmed or what the length is after trimming.

4> Null Compression

This technique is similar to null compression (COMPRESS NULL) for a column except applied to a column-partition value. A single-column or multi-column-partition value is a candidate for null compression if all the column values in the column-partition value are null (this also means all these columns must be nullable).

User-Defined Compression Techniques:

Apart from the auto compression techniques there are following user defined compression technique provided by Teradata which when applied are very efficient in saving disk space.

1>.Dictionary-Based Compression:

This technique can also called as Muti Value Compression (MVC) as it allows end-users to identify and target specific values that would be

Compressed in a given column. We can compress 255 distinct values for a column including nulls.

2>.Algorithmic Compression:

This type of compression uses Algorithm to COMPRESS the data while storing and reverse Algorithm to DECOMPRESS the data while displaying. There are few Algorithms available in TERADATA 13.10 and user can also add custom Algorithms and used it while creating a new table.

3>.Block-Level Compression:

This feature provides the capability to perform compression on whole data blocks at the file system level before the data blocks are actually written to storage.

Advantages of Teradata columnar

Following are the advantages of Teradata column Partitioning:

  • Improved query performance

The Column partitioning can be used to improve query performance via column partition elimination. Column partition elimination reduces the need to access all the data in a row while row partition elimination reduces the need to access all the rows.

  • Reduced disk space

This feature also allows for the possibility of using a new auto-compression capability which allows data to be automatically (as applicable) compressed as physical rows are inserted into a column-partitioned table or join index.

  • Reduced I/O

The Columnar allows fast and efficient access to selected data from column partitions, thus reducing query I/O.

  • Ease of use

It Provides simple default syntax for the CREATE TABLE and CREATE JOIN INDEX statements. There is no change needed for queries.

Considerations 

  • The Columnar storage reduces I/O, but they can increase CPU use.
  • The Customers whose systems are CPU bound should implement Columnar in measured steps.
  • There are tradeoffs with the columnar approach which need to be measured and examined.
  • There is processing required to match the data values from column to column and to re-build a row to return to the application in the answer set.
  • The use of columnar generally has the most benefit when a table has many columns but few are generally accessed in each query.
  • As the number of columns accessed (in the predicate or return values) increases,the CPU overhead can increase substantially.
  • Queries which access many columns will run slower when the table is stored in a columnar manner.

DELETE Considerations

The column-partitioned table has one delete column partition, in addition to the user-specified column partitions. It holds information about deleted rows so they do not get included in an answer set.

One bit in the delete column partition is set as an indication that the hash bucket and uniqueness associated with the table row has been deleted.

UPDATE Considerations

Following points needs to be considered when dealing with table updates in Teradata: 

  • Updating rows in column partitioned table requires a delete and an insert operation.
  • It involves marking the appropriate bit in the delete column partition, and then re-inserting columns for the new updated version of the table row.

An UPDATE statement should only be used to update a small percentage of rows.

Conclusion

Thus we have seen how Column partitioning can be efficient in terms of saving disk space.

They can be useful in number of scenarios, some of them are below:

  • Queries access varying subsets of the columns of table or Queries of the table are selective (Best if both occur for queries). Example, ad hoc, data analytics
  • Data can be loaded with large INSERT-SELECTs
  • When There is no or little update/delete maintenance
    between refreshes or appends of the data for the table or for row partitions.

We shouldn’t use column partitioning feature when Queries need to be run on current data that is changing (deletes and updates) and while Performing tactical queries or OLTP queries.

About Author:
Sunil Kumar is Senior Technical Consultant associate having close to 4 years of industry experienced as Teradata DBA. He worked on Teradata upgrade, Performance tuning, Viewpoint Configuration, System expansion activity and is a Certified Teradata Professional.

SQL Server Migration

Abstract: 

Licensing and costing is one of the most complicated tasks while setting up an environment i.e. IT Infrastructure environment. Usually people set up environment without knowing the costing difference of several editions with respect to their features hence not able to use resources in optimized way and that may lead to build a cost inefficient environment.

So, if we install inappropriate edition in our environment and not using its features properly that means we are paying for features when not even using it. So if we have identified such servers migrating them to the correct edition is the best solution. This is a tedious task to complete with several hours of downtime. The main challenge comes when you have to do the migration on running application for active user. You have to get the servers up and running without a single byte of data missing.

I faced these challenges and automated different tasks performed during migration with which we can surely save few hours and can successfully migrate the editions.

Key Words: SQL Migration, Version Downgrade.

Introduction:

There are several type of editions provided by Microsoft e.g. Enterprise, Development, Standard, Express etc., all are differentiated on the basis of features, where cost is directly proportional to features.

I came across a lot of environment i.e IT Infrastructure environment in my career where suitable editions were not used as per requirement. Incorrect planning may lead to pay more for features which you are not even using in your environment.

Problem Definition:

When installed editions which are not appropriate as per business requirement are identified, the best solution is to migrate that to the correct edition.This poses a question as to – Why is Migration required? Why not to stick with the installed edition only?So let’s consider a scenario , Suppose you have a development environment and you are using SQL Server 2005 Enterprise Edition .Now as we know that SQL 2005 there is very slim difference between Development Edition and Enterprise edition.All features are same except one that Microsoft don’t recommend Development edition to use on production environment. So slight difference but its gives a difference of approx 1000$ ( license cost)so it will definitely save some money for your organization.

Normal migration process takes several hours of down time and manual intervention. This also consists of tasks like:

  • Gather and store all the details like Collation, Edition, etc.
  • Backing up user Databases.
  • Backup of system databases – MASTER, MODEL, MSDB – and put in a safe location… in case you want to recover them.
  • Detaching the User Databases and keep the locations of .mdf and .ldf files.
  • Backup of all logins , Jobs, SSIS packages , Configuration settings.
  • Uninstalling the SQL Server old version / edition.
  • Installing the new edition.
  • Applying required service packs.
  • Backup of all logins , Jobs, SSIS packages , Configuration settings
  • Attaching the Databases to new Server.
  • Restoring the backups, if required.

All these in total takes several hours basically depend on the size of the data.

High-Level Solution:

To minimize the manual efforts and downtime, we can automate this whole process by performing all the migration tasks using SSIS package which will perform all these tasks sequentially.

SSIS is a platform for data integration and workflow applications. It features a fast and flexible data warehousing tool .SSIS tool may also be used to automate maintenance of SQL Server databases.

Architecture Diagram – SSIS

Solution Details:

The main tasks involved in the migration are put together as a SSIS package and can be performed.

  • Script has been made to backup all database and then detach the databases and store the .mdf and .ldf file location in the temporary file.
  • Script out all the logins using stored procedure It will create statement for all the logins keeping same password, so that user don’t face issues while login.
  • Backup all the SSIS packages and Jobs.
  • Uninstall the SQL Server using the unattended uninstallation.
  • Install the SQL Server using unattended installation and complete the post installation (another automated process).
  • Run the attach DB script (pull the .mdf and .ldf location from temporary table).
  • Create logins, jobs and SSIS packages.

Migration 2

Business benefits:

With this SSIS package we can help our organization to save time and cost.This package can be easily operated by any resources with a general KT( Knowledge Transfer ) and Migration will become an easy task.This migration can also be used for Version upgrade and following benefits can also be achieved:

  • Maintain compliance – Stay on top of regulatory compliance and internal security audits by running an upgraded version of SQL Server.
  • Achieve breakthrough performance – Can use advance features introduced in new Versions.
  • Migration becomes much less error-prone and much more repeatable -Manual Migrations are error prone. Anyone in the team can perform this activity– With an automated migration process, the knowledge of how to migrate is captured in the system, not in an individual’s brain.
  • This time could be saved and can be used for some other tasks and automationsPerforming and validating a manual migration process is often a time-consuming, task.
  • Migrating to somewhere new is not a headache – Migrations are not only repeatable, but they are configurable too. Although the underlying release process is permanent, the target environments and machines can be changed easily.
  • You can migrate more frequently – Teams that updated can deliver valuable features to their users more often and in incremental steps.

Conclusion:

SQL Server migration is really an important task and especially when you are considering factors like, cost, time, man power, compliance etc.  Using this automation we can easily achieve our goal with ease and can utilize our resources in some other useful tasks.

Without this automation, migration can also be done but it will take more time and resources and chances of error are more as compared to automation.

Reference: MSDN website

https://msdn.microsoft.com/en-us/library

Appendix

Acronyms used in this paper

.MDF

Meta Data file
.LDF Log Data file
SSIS

SQL Server Integration Package

About Author:

Apoorv Jain is Subject Matter Expert having close to 5.5 years of industry experience. He has worked across Several SQL Server technologies. Apoorv Jain holds a B.Tech degree in IT stream from T.C.T College, Bhopal M.P.

Database on Azure

Abstract: Data is the lifeblood of business. Ensuring that it’s secure, available and easily accessible are fundamental requirements of any IT department. More importantly, ensuring that data is used well—to drive processes, inform decision making and react intelligently to changing circumstances—is what differentiates successful businesses from those left behind.

The manner in which businesses ensure the availability of data is rapidly changing. Hosted services—and the very idea of software as a service—for everything from core data center functions like e-mail and business intelligence, to personal applications like photo-sharing and file synchronization, have become an everyday part of how we interact with our information. Cloud computing has enjoyed a meteoric rise over the past few years, both as a concept and as a practical component of IT infrastructure.

One particularly compelling cloud-computing solution is Microsoft SQL Azure. SQL Azure is a powerful, familiar infrastructure for storing, managing and analyzing data. It also provides the benefits of cloud computing. Shared, hosted infrastructure helps reduce both direct and indirect costs. A pay-as-you-go model helps achieve greater efficiency. And high availability (HA) and fault tolerance are built in.

This whitepaper explains the overview evolving cloud computing model and SQL Server Azure on cloud platform. It also briefs about Key features, Architecture scenarios.
Finally the paper perspective on SQL Database Azure and the future road map of the platform and how its different feature is going to help is reducing the cost,managing the resources in efficient way, Scalability, and concept of pay what you use. This is definitely
going to have its pros and cons but after overcoming few limitations in improving seems to be a promising one.

Keywords: Mssql Azure, Azure Database, Azure

Introduction: SQL Azure is the latest, cutting-edge solution developed by Microsoft as an implementation of the Data as a Service (DaaS) model of cloud-computing. SQL Azure is part of the Windows Azure.

Platform: a suite of services providing hosted computing, infrastructure, Web services and data services.The SQL Azure component provides the full relational database functionality of SQL Server, but it also provides functionality as a cloud-computing service, hosted in Microsoft datacenters around the globe.One of the first things to understand in any discussion of Azure versus on-premises SQL Server databases is that you can use it all and from anywhere having internet connectivity. Microsoft’s Data Platform leverages SQL Server technology and makes it available across physical on-premises machines, private cloud environments, third-party hosted private cloud environments, and public cloud.

When designing any application, four basic options are available for hosting the SQL Server part of the application:

  • SQL Server on non-virtualised physical machines
  • SQL Server in Azure Virtual Machine (public cloud)
  • Azure SQL Database (public cloud)
  • SQL Server in on-premises virtualised machines (private cloud)

Evolution of Cloud Computing Model

To obtain better returns on their investments in Information Technology (IT), enterprises typically focuses on adopting several technologies, transformation programs etc. Cloud computing is one of them. Cloud computing is an internet based services delivery model where services are hosted over the internet by a service provider. Cloud service providers have infrastructure, such as, servers, hardware and software and offers this as a service to enterprises.

Azure 1

SQL Database in Cloud / Azure

Before Cloud companies that provide Internet-based Services are facing many challenges today. Now a days user wants to access all data and all possible means of device and location they don’t prefer any kind of limitations. Today there are several options for hosting cloud based SQL databases, including both Platform-as-a-Service (PaaS) and Infrastructure-as-a-Service (IaaS). Creating an SQL database using PaaS is quick and simple, and will likely meet the needs of most basic applications. IaaS is more complex, requiring the creation of a virtual machine (VM). In the case of IaaS, however, it is infinitely easier to get an SQL server up and running as compared to running it on-premises. For these reasons and more it might be time to consider moving your databases to the cloud. From the IT management perspective. SQL Azure is built on the same Microsoft SQL Server® technologies and proven to provide high availability, reliability, and security.

From the business perspective, SQL Azure offers a cost-effective approach for managing data, with a flexible consumption-based pricing plan, near-zero capital and operational expenditures, and the ability to quickly and easily scale up or down as your needs change.

Architectural Overview

Azure 2

Provisioning Model
SQL Azure is designed to support extreme scale and low cost while providing a familiar environment to administrators and developers.

Windows Azure Platform Accounts
To use SQL Azure, you must begin by creating a Windows Azure platform account. Using this account, you can access all of the facilities within the Windows Azure platform. This account is also used to bill for usage for all Windows Azure platform services.

SQL Azure Servers
Each Windows Azure account can contain multiple SQL Azure servers. These servers are not implemented as SQL Server instances; instead, you can view them as logical concept that is used to provide a central administrative point for multiple SQL Azure servers.Each server includes logins, just as you find in on premise SQL Server instances, and you can also specify the geographic region your server is located in at this level .SQL Azure provides you totally a different interface to
maintain different types of Administration.

SQL Azure Databases
Creation of tables, Views, SPs , Databases are still the same.SQL Azure Databases are implemented as replicated data partitions across multiple physical computers geographic location that is specified for the SQL Azure Database server that is hosting the database an SQL Azure data centers within multiple servers. This architecture provides automatic fail over and load balancing. In this way, SQL Azure Database achieves high availability and stability for all applications from the smallest to the largest without requiring intensive administrative effort.

Key Features:

a) Effective Manageability: SQL Azure Database offers the high availability and functionality of an enterprise data center without the administrative overhead that is associated with an on premise solution.This self-managing capability enables organizations to provision data services for applications throughout the enterprise without adding to burden and could use its technology-savvy employees from their core tasks to maintain a departmental database application.

b) Improved Low-Friction Provisioning: When you use the traditional on premise data infrastructure, the time that it takes to deploy and secure servers,network components, and software can slow your ability to prototype or roll out new data-driven solutions. However, by using a cloud based solution such as SQL Azure, you can provision your data-storage needs in minutes and respond rapidly to changes in demand. This reduces the initial costs of data services by enabling you to provision only what you need,secure in the knowledge that you can easily extend your cloud-based data storage if required at a future
time.

c) High Availability: SQL Azure is built on robust and proven Windows Server® and SQL Server technologies, and is flexible enough to cope with any variations in usage and load. The service replicates multiple redundant copies of your data to multiple physical servers to ensure data availability and business continuity. In the case of a disaster, SQL Azure provides automatic failover to ensure maximum availability for your application with minimum downtime.When you move to SQLAzure, you no longer need to back up, store, and protect data yourself it helps you in saving time and cost.

d) Scalability: Another key advantage of the cloud computing model is the ease with which you can scale your solution. Using SQL Azure, you can create solutions that meet your scalability requirements,whether your application is a small departmental application or the next global giant in the market.

e) Global Scalability: A pay-as-you-grow pricing model allows you to quickly provision new databases as needed or scale down the services without the financial costs associated with unused capacity. With a database scale out strategy your application can utilize the processing power of hundreds of servers and store terabytes of data.SQL Azure runs in worldwide data centers, so you can reach new markets immediately. If you want to target
a specific region, you can deploy your database at the closest data center.

f) Familiar Client Development Model: When developers create on premise applications that use SQL Server as a data store, they employ client libraries that use the Tabular Data Stream (TDS) protocol to communicate between client and server. There is a large global community of developers who are familiar with SQL Server and have experience of using one of the many client access libraries that are available for SQL Server, such as Microsoft ADO.NET, Open Database Connectivity (ODBC), JDBC and the SQL Server driver for PHP.SQL Azure provides the same TDS interface as SQL Server, so developers can use the same tools and libraries to build client applications for data that is in the cloud.

g) Synchronization and Support for Offline
Scenarios: SQL Azure is part of the rich Microsoft data platform which integrates with Microsoft Sync Framework to support occasionally connected synchronization scenarios. For example, by using SQL Azure and the Sync Framework, on premise applications and client devices can synchronize with each other via a common data hub in the cloud.

Scenario:

Web Application
Most Web sites require a database to store user input,e-commerce transactions, and content, or for other purposes. Traditionally, such a data-driven Web site is implemented with a database server in the same data center as the Web server.

Using SQL Azure, Web developers can choose to place data in the cloud where it is highly available and fault tolerant. As with the departmental application scenario, you can host your Web application on your own server, or by using a third-party Web host, and access the data in SQL Azure across the Internet.

Data Hub
In a data hub scenario, you typically want to enable various mobile, desktop and remote users to collaborate by using the same set of data. Consider an EBay company that has a large sales force that consists of thousands of people who are scattered across Globe. Keeping customer accounts, stocks and offers data synchronized across is a constant problem. The first part of the problem is maintaining stock details from warehouse. The second part is getting information about various offers on different products and customer data.

The eBay Company needs a solution that will:

  • Keep each pricing system up to date with the latest pricing information
  • Keep the warehouse system up to date with stock information after different transactions, maintaining the isolation of transactions. Currently, all the data is stored in a central SQL Server database in the data center. In addition, employees in the sales force use an application that runs on their portable computers and stores data in SQL
    Server Express. The IT department does not want to open the firewall to the on premise data center to provide possibly insecure access from each salesperson’s portable computer. The development team can provide a safe and fully synchronized solution that uses SQL Azure, by completing the following three tasks:
  • Create a database in SQL Azure to store product data and customer data.
  • Create a Sync Framework provider for the data center.

This sync Framework provider keeps product and customer data synchronized between the data center and the SQL Azure data hub.

Create a second Sync Framework provider for the sales force’s portable computers. This Sync Framework provider keeps product, account, stock and customer data synchronized between different departments and the SQL Azure data hub.

Azure 3

Product pricing data flows from the enterprise database, through SQL Azure between thousands of salespeople. Customer contact data flows from more than so many salespeople, through SQL Azure, to the enterprise database. When a salesperson’s portable computer is offline, changes that occur to local data are tracked. When the portable computer’s Internet connection is restored, the Sync Framework provider enumerates these changes and sends them to SQL Azure. The safety of the corporate data center is ensured.

Conclusion:

SQL Azure Database is a cloud-based database service that offers developer agility, application flexibility, and virtually unlimited scalability, cost-effective delivery model. In addition, support for the most prevalent Internet communication protocols ensures ease of deployment and use. The benefits of cloud computing are undeniable. The cost-efficacy, server consolidation, on-demand provisioning and geographic diversity that cloud computing offers represent just the beginning of the advantages that we’ll come to realize
by moving data into the cloud. SQL Azure combines the powerful performance and familiar environment of SQL Server with the benefits of cloud computing. It should fit in well as a solution for any organization looking to build a more dynamic, cost-effective data-management infrastructure.

About Author:

Apoorv Jain is Subject Matter Expert having close to 5.5 years of industry experience. He has worked across Several SQL Server technologies. Apoorv Jain holds a B.Tech degree in IT stream from T.C.T College, Bhopal M.P.

UC4 (Automic) Job Scheduling

Abstract: UC4 has always been known for their industry-leading and innovative capabilities in scheduling applications across enterprises. UC4 continues this tradition.

It enables connectivity to any application, databases, operating system and capable to support the growing business. It is capable to integrate all business applications effectively. Compared to other scheduling tools available its immense feature such as forecasting, reporting, error detection and correction, audit and Load balancing make it more powerful and reliable.

Architecture of this automation tool is object oriented which allows you to easily reuse existing task and process investments. Build once and use many times across departments, teams and individual use cases. It also has powerful set of object types such as Calendar which helps to reuse existing keyword to fulfill complex scheduling requirement. It is capable to deliver file transfers between your application, your external partners and suppliers.

UC4 have load balancing feature by which zero down time can be achieved. Not only applications but day to day operation related task can be automated in the tool which helps to reduce operational cost and human errors.

Keywords: UC4, Automic, Job Scheduling,Workload Automation


What are Application Automation Tools?

Application automation tools, often known generically as job schedulers, facilitate complete automation of business processes. The scheduling component makes it possible to automatically launch business processes on specific days at specific times. The business process can, and often does, consist of many applications serving many different areas of an enterprise. True automation tools should make it possible to add dependencies (e.g.: run Job B only after Job A completes), and “if-then” logic that takes the place of an operator checking the state of the system. For example, an automation tool should be able to check for the existence of specific files. With a sophisticated automation tool, you should be able to completely automate a business process, eliminating all human intervention except for troubleshooting. A typical business process that can be automated is shown in the diagram below. It represents a data warehousing operation. Notice the distinct lack of human intervention.

Main Features of UC4 Application Manager

UC4 is a powerful application job scheduling tool that meets the needs of operators, programmers, and system administrators throughout the life cycle of an application.  UC4 allows operators to submit jobs on an ad-hoc basis, view the output online, and print the output to a system printer or a local Windows printer.  UC4 provides programmers the tools to set up sophisticated job scheduling without writing scripts.  Instead, users can create logical conditional statements with a few mouse clicks.  System administrators will find UC4 roles and security are powerful tools for managing access to UC4.

UC4 Job Scheduling is a service that enables the enterprise to schedule and monitor computer batch jobs. The scheduler is able to initiate and manage jobs automatically by processing prepared job control scripts and statements.

 Applications that utilize the UC4 scheduling service benefit from a single point of control for administration and automation of operator activities to ensure a more consistent and reliable operations. This service offers better control   for job processing across multiple ITS managed applications and platform in a distributed environment.

The UC4 scheduling service enables ITS to control jobs across managed applications so they run at the right time, in the proper order of execution (including parallel and sequential processing) with monitoring services to ensure jobs terminate normally and provide problem management with error reports for those that do not.

End users can be granted view access for their application environment in the UC4 scheduling system to monitor job status and progress.

  • UC4 Architecture:

UC4 platform can be used to automate processes across all environments of your information system! This is possible through the definition of multiple logical environments from a single UC4 infrastructure, reducing the cost of installation and ownership of your automation infrastructure.UC4 Automation engine communicates with the target machine through TCP/IP.

Remote Agent: On each target machine, UC4 agent is establishes communication with automation engine.

Operation Manager: This is the administrative console which monitors activities of all scheduled batches as well as automation engine Health status.

Service Manager: Service manager console gives the communication status with each agent by heart beating with remote agent through Communication processes.

uc4_architecture

UC4 Job Scheduling:

Objects are combined to define jobs. Jobs are combined with other objects to create process flows that run batch processes.  All of this is accomplished without the use of scripts.

There are various UC4 objects available to fulfill your Scheduling requirement.

  • Jobs: Jobs-are the basic building block in UC4. For each program that needs to run (for example: FTP, database load), a job must be created.  A job contains all the information required to execute a program or script on the server and handle its output.  When a job is created, it will specify the program location, input and output parameters.  Jobs are run both individually and as components of UC4 process flows.  Furthermore, a job can be a component of any number of process flows.  If a job definition is changed, the change is applied to every process flow that includes it.
  • Job plans (process flows): Jobs are combined to create process flows. Process flows are equivalent to job streams and run any number of jobs.  Process flows include scheduling and exception handling information.  When jobs and process flows are added to a process flow, these objects are referred to as ‘process flow components’
  • Events: Jobs/job plans can be triggered based on time or existence of file. There are two types of event object
  • File event: This is file watcher objects which senses for file and if true triggers the actions.
  • Time event: This is used to trigger job/job plan multiple times a day.
  • Schedule: Schedule is Parent for all objects, the objects which are to be scheduled needs to placed in schedule object where frequency of job/job plan can be added. Schedule loads every midnight and loads the objects are to be triggered. Schedule runs for 24 hours a day and gets auto reload at 00:00 midnight for next day execution.
  • Calendar: This is featured object of UC4 in which we can create the statics as we as dynamic calendar condition and use it to schedule objects. We can create Static, group, weekly, monthly, Roll on key words in calendar object to fulfill scheduling requirement.

uc4wf
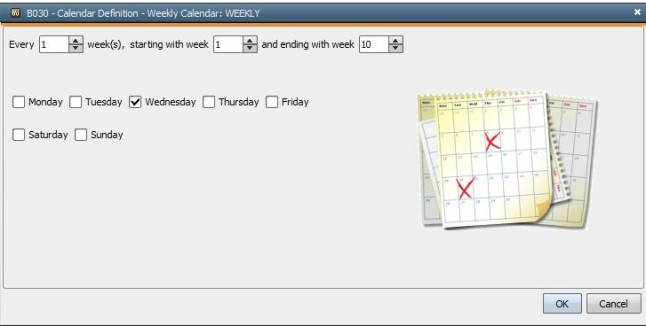
To schedule the workflow to run on every Wednesday, create the weekly calendar keyword in Calendar object.

ucc


As we need to add the workflow in schedule to automate the schedule and add the keyword in properties of workflow to run it weekly.

uccd

Example: Application owner is looking for automation of their workflow for the given scenario:

Workflow should start at 20:00 PM EST  on every Wednesday

Where first job will be – Job A, After successful   completion of job  A, Job B should start. Job C and Job D     and can parallel after completion of Job B.

  • Here, first we need to create jobs A,B,C,D, as per information supplied by application team.

Pre-requisite to create jobs would be target server name, login name to run the job, Script path and name.

  • Once jobs are created arrange them as per dependency mentioned, join the job by line tool which will create the predecessor/successor dependencies. START and END are default blocks while creating workflow in UC4.
  • The workflow for given requirement would be as follows:


Error Handling in Jobs:

Behind every program type object is a program type script.  The program type script performs all the main work of running the program specified in a job definition.  Specifically, the program type script accomplishes one or more of the following six tasks:

  • Program execution
  • Parameter passing
  • Error determination
  • Output registration
  • Debug/administration
  • Termination

For UC4 to function as the tool it can be, it is imperative that all jobs incorporate error handling.  Developers must ensure custom code exits with an error code in an abort situation.  Instances and each object will need evaluation for the proper function.  If programs do not exit with an error, UC4 assumes that the process has completed successfully and will continue to process the process flow/successor.

Here is an example of SQL for error handling in a script:

WHENEVER SQLERROR EXIT  sql.sqlcode

OR           err=$?

                Exit $err

The code err=$? traps the exit status of the last command executed.

OR           if errorlevel 1 set err=%errorlevel%

The code err=%errorlevel% traps the exit status of the last command executed.

  • Forecasting: UC4 forecast feature helps scheduler to detect and correct for any configuration errors. Forecast report helps to manage application outages as it gives details of objects which will execute in outage window and actions can be taken on them in advance.


  • Advantages of UC4
  • Improves current data processes, such as automating processes that are currently manual. Improves job handling across disparate systems, especially those that have specific input/output dependencies, sequence, etc.
  • Provides the ability to check and validate jobs and notify on failures.
  • Extends services by providing the ability to securely move data from one system to another that can’t easily be completed today
  • Provides reporting capability.
  • Provides monitoring of jobs.
  • Provides ability to schedule multiple jobs with flexibility and complexity.
  • Allows for more informed and calculated decisions of maintenance schedules and impact analysis on scheduled jobs.
  • Ability to create and better manage business rules across disparate systems.


Conclusion:

It is now common for global enterprises to possess thousands of application and application servers rely on extensively globalized networks and store more data than ever before. Therefore, it is more important than ever to have single enterprise-wide automation solution that will help you efficiently manage this complex IT landscape-a solution that delivers what  uc4 refer to ONE Automation.

The UC4 Automation Platform responds to this need, providing single intelligent automation solution that automates both processing and decision making across hybrid computing environments-Physical, virtual and cloud. UC4 delivers event based as well as time based automation and it supports this most operating systems, databases, applications and services of any automation solution available today. By eliminating silos and removing manual steps that slow execution time, decrease productivity and introduce human error, the UC4 Automation Platform will enhance your efficiency, accuracy and agility and will lower your operational costs. And it will enable you to deliver the promised services on time, every time.

About Author: 

Manoj Sonawane is Senior Technical Consultant associated having close to 5 years of industry experience in workload automation and managed file transfer. He worked on integration, migration and go live support for UC4 and Autosys workload automation products.

Effective utilization of ITSM toolset and its impact on ROI

Abstract: IT Service Management is a strategic approach to designing, delivering, managing and improving the way information technology (IT) is used within an organization. IT service management deals with how IT resources and business practices in together, are delivered in such a way that the end-user experience the most desired result from the accessed IT resource, application, business process or an entire solution stack. More than 100 tools available in market which provide end to end solution across enterprise. Remedy, Service Now, HP, Cherwell are some of the top vendor contributing majorly in BSM market. Customer spends lots of resource and asset implementing these processes in tools but they are not getting its full potential. Till last decade ITSM tools were restricted to IT department and not getting utilize beyond IT. Now trend has been change to SaaS based tools, managing end to end non IT processes along with traditional IT process. This help organization to manage all business processes and application on single platform and help to get more ROI as customer has to pay only for single platform to manage single source of truth instead of investigating on diverse tool sets licenses and platform cost.

Keywords: ITSM, BSM, IT, SaaS, DD, SIP, SDLC, AD, OIM

1. Preface:

1.1 Intended Audience

This document is intended for use by ITSM consultant, implementation specialist and ITSM tool architect.

1.2 System Requirements

The tool consists of SaaS based model in which application servers and DB resides in vendor data center. As application developer would require client installed on system the system. Most important admin account needed to develop or customize application. Consideration is that customer is already using SaaS/ITSM tool for managing traditional ITIL process.

1.3 Team structure

Team needs to be consistent of tool SME, business analysts, third party tool/application SME, integration specialist and vendor support team.

2.Platform setup

It’s always recommended to set up platform and foundation before migrating or developing non IT processes. As first phase setup customer environment needs to be built for managing IT processes and required entities like user management, AD setup, CMDB setup and traditional ITIL process setup. Till time customer and ends user get familiar using tool, preparation for next transformation phase needs to be done as part SIP.

3. DD existing business process/tools

As mentioned first phase would be same as that of traditional tool setup. Second phase is major driver for transformation. As part of DD for second phase, existing tools used by business or tools about to expire need to be evaluated and prepare gap analysis and HDD &LDD. Any required integration needs to document and taken care as part of requirement gathering. Business Analyst, business tool SME play major role in this phase.

4. Build and migrate to SaaS custom app

ITSM tool specialist/SME develops and migrate existing business tool into SaaS ITSM as custom application developed custom apps go through standard SDLC/Agile cycle from development ,testing and finally to production deployment phase.

5. Use case

Customer was using Service Now as ITSM SaaS tool for managing ITSM process. HR processes were partially in existing tool and manual setup. Most of time resource joining and on boarding get impacted as many flaws in existing on boarding process. As part of SIP, customer decided migrate HR on boarding/ off boarding into Service Now. As part of DD and designing phase, it’s been decided to go ahead with custom order guide and service catalog for automating on boarding and off boarding process.

AD and OIM integration for email exchange were implemented as part of automation. Service Now workflow played important role in approval and fulfillment phase.

Finally process and end user guide have been developed and in this way customer get rid of managing multiple tools and manual intervention in resource on boarding and on boarding.

test


Conclusion

  • Significant increment in ROI (approx.80k $ per year) as customer gets rid of managing multiple tool and platform licenses. No additional cost pays for platform. Or no additional license cost for separate tool.
  • Removal of manual intervention through complete workflow automation.
  • 95% accuracy found in resource on boarding and off boarding.
  • Due to SaaS model customer saved cost involved in on premise existing tools and resources.
  • Existing platform Notification, User management and workflow escalation process have been used which saved additional cost instead of managing those through separate tool set.
  • Became bench mark for single source of truth for end to end business apps management in single SaaS platform.


About Author

Sharad Suryavanshi is Lead Technical Consultant associated having close to 5.5 years of industry experience in ITSM and cloud computing. He is involved  in couple  of  end to end implementation  projects. As ITSM tools expert he has worked on dedicated integration, migration, upgrades and post go live support.

Deploy VMware vSphere HA Cluster with HP Virtual Connect FlexFabric

Abstract: This whitepaper would bring attention on HP Virtual System VS3 solution. This abstracts is an overview of HP Virtual Connect and deployment of VMware vSphere. This solution provides very robust, reliable and optimize usage of HP infrastructure with flex fabric technology. This includes several advantages like elasticity,Storage virtualization and Network bandwidth customization. HP Virtual Connect is a set of interconnect
modules and embedded software for HP Blade System c-Class Enclosures. Virtual Connect includes the Following hardware components,

Flex fabric modules for HP Chassis
HP Virtual Connect Manager is embedded into interconnect Flex Fabric Module. A single virtual connect domain can have maximum four C-7000 chassis including 64 blade servers.

Diagram 1


Flex fabric Adapters for HP Blade System
HP BL servers have FlexLOM Converged Network Adapter to increase the throughput of server and eliminate multiple nic or hba cable attach to server.This introduces new Flexhba and Flexnic.

Diagram 2

HP Blade Chassis with FC module
HP follows the standard configuration of C-7000 chassis and Virtual connect module

Capture 3

Overview of Virtual connects and Design

Virtual connect provide the interface between the physical servers and LAN / SAN.The basic configuration wizard requires to setup virtual connect domain. The virtual connect creates the pool of MAC address,WWN address ,Serial Number are provide to pool of servers. During this setup you are require to configure Fiber module uplinks and Ethernet module uplink s ports. The module’s uplink attached with SFP to external network switch and SAN switch. The server profile is actually bringing the connection of physical server to share uplinks of SAN and LAN. The virtual connect manager web base tool used to configured Virtual connect domain, and all the related component share network link, San uplink and Server profile.

Virtual connect with Server Profile

The server profile must be properly mapped with chassis’s bay server. The server profile contents the network and storage adapter uplink also manages Network Mac address and WWN of hba.This information are stored in server profile persistently which useful on hardware replacement. The port mapping of Flex module with FlexLOM adapter must be understood before assigning to physical servers.

Capture 4

Network uplinks
The network shared uplink can be configuring in two ways Tunnel Vlan and Mapped Vlan in Virtual connect.The industry best practice to use in tunnel mode which will override the vlan limitation of 320 vlan and work as pass-thru. Model. The Vlan tagging will be mange
by external switch and ESX.

Capture 5

The LOM interfaces dependent upon the FlexLOM adapter choose for blade server. In the above diagram.4 Virtual connect interconnect port X5 and port X6 are configured for network uplink. These ports can configure in LACP (Link Aggregation Control Protocol) to provide active/active. The network switch should configure for spanning tree edge. The requires network switch ports should be tagged allow vlan.

Capture 6

Fiber Channel uplinks
In the above diagram.4, Virtual connect interconnect ports X1 and X2 are configured for SAN uplinks. The San switch ports must be NPIV (N_Port ID Virtualization) enable .We have successfully configured Virtual connect with shared uplink supporting various vlan and San fabric uplink.

Bandwidth Details
The virtual connect as feature to customize the Network and SAN bandwidth

bandwidth_p2


uplinks_2

Once the Server profile assign to chassis bay we can power on the servers. In order to install the ESX on blade server under virtual connect.HP publishes the HP Custom DVD ISO image which needs to download from the HP website for installation. This image contents all the required drivers including FcoE. In the current design we have created two shared network uplink and two San uplinks. We have chosen vlan tunnel mode so it allow multiple vlan from server. We have created vnet on network tunnel. The vnet needs to mapped logically in server profile

profile_map_p2

Two vnet are assign to trunk_1 and trunk_2 in server profile. The additional two vnet will be added to server profile but we have not assigned any share uplinks The two Vnet assigned to share uplink will used to for VMware service management and rest two vnet without uplink will use for Vmotion so it will not use the network switch bandwidth and V-motion activity. This will be done over the Virtual connect internal stacking links.

VMWARE VSPHERE INFRASTRUCTURE DESIGN ESXi installation

ESXi installation on the server use the ‘HP Custom Image DVD ISO image which download from HP repository site. This image has all the required drivers including FcoE. ESXi auto deploy, traditional and VMware auto deploy. Boot the server for installation in ILO of blade server. We can configure the vlan tagging on hypervisor for ESXi installation.

esx_p3

DATASTORES AND LUN’S DESIGN
The VMware vSphere can connect to storage via SAN array LUN’s formatted as VMFS via FC and FCOE.We have two FC uplink one from each interconnect module. Using FlexLOM two Flexhba assign to each host. Virtual connect MAC / WWN pool from provides the virtual WWN to each host. The WWN will be visible on storage switch and LUN can be assign direct to ESX host.

Network DESIGN
VMware vSphere vDistributed switches will be used.VSphere Distributed switch is created at the Virtual Datacenter level and acts like single virtual networking which spanning across multiple vSphere hosts. We have added four vNet on each server profile. The pnics will be used for host uplink for Uplink port group. The pair of Vmnic assign to specific vDS as per their function like Management, Vmkernel. Let’s assume vmnic0 and vmnic1 are attached to share network uplink in Virtual connect and vnic3 and vmnic 4 does have assigned any share network link in virtual connect. So we can use vmnic3 and vmnic4 used for Vmotion traffic.This will save network bandwidth for production operation. It is important all the inbound and outbound vlan network traffic must be tagged on network switch.

Network_update

Advantages of Virtual connect
The HP product virtual connect has very easy to manage and deployment is quick. There is no single point of fail in all teams network, power, and storage. The infrastructure is suitable for any enterprise customer.

Issue and workaround
HP provided the one stop repository that provides access to HP develop bundles along with drivers. VMware used these bundle to download for update. HP provides periodic updates on system firmware as well as VMware updates to fix the bug or any known issues.

Conclusion
In today’s world every customer wants to spend less time on infrastructure build and deployment. The Virtual connect solution is best industry standard for enterprise customer. The product has all component servers, storage and network from same vendor HP so the support will be single point of contact.

Reference
1. Hewlett-Packard Development Company, February 2012, Virtual Connect Flex Fabric Cookbook
2. Hewlett-Packard Development Company, June 2013, HP Virtual Connect for c-Class Blade System Version 4.01 User Guide

Appendix
For more information To read more about the Virtual Connect Flex Fabric module,
http://www.hp.com/go/virtualconnect
To learn more about HP Blade System,
http://www.hp.com/go/bladesystem
For additional HP Blade System technical documents,
go to http://www.hp.com/go/bladesystem/documentation

About the author

Aslam Shaikh is Subject Matter Expert having close to 13 years of industry experience. He is part of UNIX, Storage and backup and worked across UNIX technologies. Aslam Shaikh holds a Bachelor of Science from Modern College of Arts, Science and Commerce Pune.

Innovative thinking first- Why ITSM for your organization

Abstract: The practice of IT service management (ITSM) is widely adopted by IT infrastructure and operations (I&O) organizations around the globe to help deliver technology services better, faster, and cheaper.

To succeed with ITSM, I&O professionals rely heavily on fit-for-purpose ITSM tools. However, there is often discontent with such tools, but unfortunately, selecting the right ITSM tool has never been easy, and software-as-a-service (SaaS) now adds an extra dimension of complexity.

IT infrastructure and operations departments should not perform an ITSM process just because it seems like a good thing to do or is an ITIL-best practice. An organization should adopt a process which can help deliver specific outcomes related to business objectives and operations.

This white paper offers information on the selecting right ITSM tool, growth of the SaaS for ITSM market; Guidance on the key functional criteria to assess and summary of SaaS-related benefits and risks.

Keywords: ITSM,I&O, SaaS


1. Preface

The existing Situation:-

One primary origin of ITSM can be found in the systems management services and functions historically done in large scale mainframe environments. Through constant refinement over the years these services and functions attained a high level of maturity. Problem and change management, configuration management, capacity planning, performance management, disaster recovery, availability management, etc. are some examples.

When examining the differences between mainframe systems management services and ITSM, it becomes apparent that when ITSM is applied in today’s IT environment and across the enterprise the benefits and sophistication of its best practices are highlighted and exemplified. Where mainframe environments are typically centralized, ITSM is applicable to both distributed and centralized environments. In addition, where mainframe services are typically stand-alone and technology based, ITSM provides for integrated services that are process based with a focus on satisfying business requirements.

Although managing the technology itself is a necessary component of most ITSM solutions, it is not a primary focus. Instead ITSM addresses the need to align the delivery of IT services closely with the needs of the business. This transformation of a traditional “business – IT paradigm” can be depicted by some of the following attributes:

Figure 1

Problem areas:-

We are currently facing below problem areas in our existing tools:-

  1. Reluctance to write off old environment / softwares
  2. Failure to realize that this can cost more in the long run
  3. Heavy customization and configuration
  4. Innovation past its time
  5. Array of tools that dont work together
  6. Comforting but full of patch work

Measures taken:-

The first step is to get adoption workflow in place. The next step is to analyze the tool requirements

  1. Define outcomes that you need from tools that relate to these
  2. Talk to the business and listen to their view
  3. Be realistic about what you can automate with tools
  4. Think of what is possible from 3 perpectives
  • Strategic
  • Tactical
  • Operational

2. Selecting an ITSM Tool

  • Start With an ITSM Maturity Assessment

The first step is to assess the existing model and compare with the maturity model available in market. The assessment gives a snapshot of the current state of IT maturity and are designed to provide you with contextual advice (both tactical and strategic) on how to improve. Without an improvement road map you risk investing in a tool that’s not aligned to your future state.

2.2 Determine Your Key ITSM Tool Integrations

Once assesment is conducted IT organizations should then gain an understanding of how the ITSM tool will fit into their broader portfolio of IT operations management tools. The majority of IT organizations have multiple, domain-specific IT management tools An ITSM tool is something that all domains will touch in some capacity, so understanding integration capabilities at the forefront of the buying cycle is critical..

2.3 Share your views and get reviewed by industry Expertise

It is wise to participate in demos, talk to vendor references,read product reviews and speak with your peers about what IT service management tools they use and what their own experiences have been.This will help you understanding which solutions make the most sense given your maturity level, requirements, and budget. It will also help if you review your contract, pricing, the statement of work, and anything else the vendor puts on your table.

2.4 Evaluate the ITSM Vendor’s Value as a Business Partner

We aren’t just choosing an IT service management tool; we are choosing a partner to do business with—hopefully over a period of many years. Make sure you have faith that the vendor is going to follow through on its commitments. One great way to evaluate this is to review a vendor’s ability to adhere to a product roadmap schedule

2.5 Evaluate Your ITSM Licensing and Hosting Options

Be sure to obtain a solid understanding of short- and long-term licensing and hosting options. Do you need an on-premises or cloud-based solution? If you are leaning toward one model in particular, what assumptions are driving your preference? If you are looking for a cloud-based ITSM tool, do you plan to host it directly or through a third party, and what are the associated costs? One thing to consider when considering SaaS versus on-premise tools is that cloud-based solutions often appear very attractive from a cost perspective because you’re not spending as much money up front. But it’s possible that over time you’ll find yourself spending more than you would under a perpetual model. It’s critical that you perform a financial analysis across various scenarios before you can effectively compare vendors on cost factors to develop and understand total cost of ownership.

2.6 .Focus on Improved Customer Experience

Lastly, do not neglect the business perception of IT when you make your ITSM tool selection. One of the primary goals of your ITSM tool implementation should be to increase end user self-sufficiency and improve the IT-business relationship. IT organizations must therefore understand how their service management tool facilitates such improvements. For example, does your potential solution provide an IT self-service portal that is easy to customize and configure? Does the solution provide a means of gathering information and context about users, so that support analysts have relevant and timely information that can improve the end user experience? These things matter, as the IT service desk drives the perception of the entire IT organization. With this in mind, invest in a service management tool that allows your service desk staff to present a better face to the business, and you will see results!

  1. Enter SaaS -Software-As-A-Service

In 2007, two things forever changed the landscape of ITSM tools and vendors:

  • ITIL v3 extended the scope of ITSM from 10 processes to 28
  • ServiceNow started to gain real traction with its “modern” SaaS ITSM tool.

Towards 2012, nearly all ITSM tool vendors across all market segments now offer an SaaS solution, and ITSM tool vendors of all sizes now have far greater geographic reach in terms of both marketing and sales capabilities.

The Leading SaaS ITSM Tools Segmented By Target Market and Customer Success


Figure 2

The Key Benefits Of SaaS For ITSM

The software-as-a-service delivery model can offer fast deployment speeds, low upfront costs, and ongoing flexibility to scale up or down as needs change. These benefits are universal, whether applied to customer relationship management (CRM), enterprise resource planning (ERP),

collaboration, or ITSM.

Key benefits of the SaaS delivery model for ITSM include:

  • Subscription-based pricing that lowers total cost of ownership, initially.

For many firms, the key benefit of SaaS is its simple, subscription-based pricing model: Firms pay a subscription fee per month (or year) per user that covers everything needed to operate, including support and maintenance.As a result, the total cost of ownership of SaaS is lower. However, this is often only temporary, as the total cost of ownership of SaaS often can become more expensive than on-premises after three to four years, depending on customer ITSM maturity.

  • Simple implementation and upgrades that minimize staff effort.

An SaaS-delivered ITSM tool only requires a web browser and an Internet connection to function — no client to install, no hardware to support, and nothing to upgrade locally. SaaS also offers seamless, automatic upgrades, typically two to four times per year. This means that users can access the latest features and functionality faster than in an on-premises deployment, where upgrade cycles often take 18 to 24 months

  • Reduced support needs.

SaaS can reduce or eliminate internal IT support since the SaaS provider typically includes support and maintenance in the subscription.

  • Greater opportunity of use.

The simplicity of pricing can also be viewed from a value-for-money perspective, in that a per-seat subscription will usually cover access to capabilities across multiple ITIL processes rather than the traditional need for organizations to buy multiple licenses across multiple ITSM products (or modules). This gives an organization the freedom to

continue its adoption of the ITIL framework over time without additional cost, other than for additional users and seats as necessary.

  • Higher user satisfaction.

Software-as-a-service’s ease of use, instant availability, and pay-per-use nature are in stark contrast to older on-premises experiences that firms perceive as clunky and which take months or years to roll out, all while spending significant capital investment upfront before value is received. 

4 .SaaS related Risks

Software-as-a-service (SaaS) is attractive to IT departments because of low upfront cost benefits, but it can be a legal minefield if businesses fail to conduct a proper risk analysis.

SaaS enables IT directors to transfer software costs to operational budgets to reduce pressure on capital expenses. It helps reduce software support costs and can be deployed quickly to meet business needs. But these benefits should not blind businesses to legal pitfalls.

  • Usage Risk

Usage Risk refers to the risk the organization on how you are utilizing a specific SaaS app.  The two most important considerations are:

  • Is your organization using this cloud app for a critical business function?
  • Does this app store sensitive data?

If no to both of these, this specific app can immediately go on the ‘low risk’ list.

  • One Problem Affects All:

If the hosted solution fails due to some reason all the customers are affected. This is seldom the case in a license model

  • Bug Fixing and Updating Patches:

In the license model, the process of fixing bugs and updating patches were more predictable and linear. Often the customers have the choice of delaying or speeding up the patch updation depending on how the specific problem affected them. For important customers, ABC also had the ability of sending a quick patch just to address their problem. In the SaaS model, a single hosted version for all customers took away this flexibility. One update would affect all and the company has to become more agile and extremely process and quality conscious.

  •  Dependence on Third Parties:

In the SaaS model you are very dependent on third parties such as your hosting service provider, communication network providers and other partners in the ecosystem who may or may not be directly visible to the customer. Any failure on the partner’s part reflects fully on you as far as the customer is concerned. And sometimes the failure may be very serious.


  1. Conclusion

In this age of intense competition and fast changing opportunities it is imperative for companies to continuously evolve to perform better. In this context, if the right benefits are provided to the customer, SAAS is a very compelling and rewarding business model. However, one should bear in mind that the vulnerabilities have become much more and events completely out of your control can now disrupt your business more easily than before. The cost of success can be pretty high!

While your business might be enterprise level in terms of revenue or employees , it does not necessarily mean you will automatically need an enterprise-level ITSM tool.

A key factor to consider is your level of ITSM maturity based not just on your technology needs, but those of your people and processes.We should ask ourselves: What ITSM processes do we need to be supported by a new ITSM tool, SaaS or otherwise?

If it is just the core processes such as incident, problem, and change management — then why limit your organization to just enterprise tools? Expanding your tool selection horizon has many potential benefits, from improved capabilities to cost savings and support.


About  the Author

Kamal Dwivedi is having 11 years of industry experience. Being a SME, he has worked across ITSM technologies. Kamal holds a MCA Qualification from MITM Indore.